How to Set up Let's Encrypt on an Intranet Website
Disclaimer: Yes, it’s possible, but it requires a little manual action every three months.
There are situations where it is desired to have a website only available from the local network but not from the global internet. In most cases intranet websites are only served via HTTP but not via HTTPS. This however is not exactly secure, since the entire traffic between your computer and your server is transmitted in plain text (even passwords). So an attacker could obtain sensitive data as soon as they manage to break into your local network. Additionally, when you open a website served via HTTP, this bad boy sneaks around the corner:

When using HTTPS on the other hand, all of the data gets encrypted prior transmission, which means that an attacker can’t steal your passwords anymore. Setting up HTTPS for an intranet site is however not as straight forward as it is for a normal website. That’s why I’m here, to show you how to do it.
Prerequisites
- You have already set up your Apache server (on Linux) so that the website is accessible from your local network via HTTP. I use Apache 2 on Ubuntu Server but other Linux distros work too.
- You own a domain (or subdomain). Let’s Encrypt only supports creating certificates that are associated with a domain. If you don’t own a domain yet, you can register one for cheap. I have even seen some registrars offering free domains, which are sufficient for this project.
- An approximate understanding of how HTTPS works and what Let’s Encrypt is.
Setting up a Domain for Your Server
As mentioned above, Let’s Encrypt certificates can only be associated with a domain, but not an IP address. Therefore you will have to give your server a domain (like myserver.example.com). Don’t worry, your server won’t be accessible from outside your network, since we’ll only point that domain’s DNS record to a local IP address. So if someone outside your network tries to go to your website, they will only see an error message that this IP address is not reachable.
To setup things you first need to find out your server’s local IP address. To do that, just enter following command into your server’s shell:
$ hostname -IIn my case this returned 192.168.178.27. Now log in to your domain registrar’s admin panel, and setup a new A record for your domain:
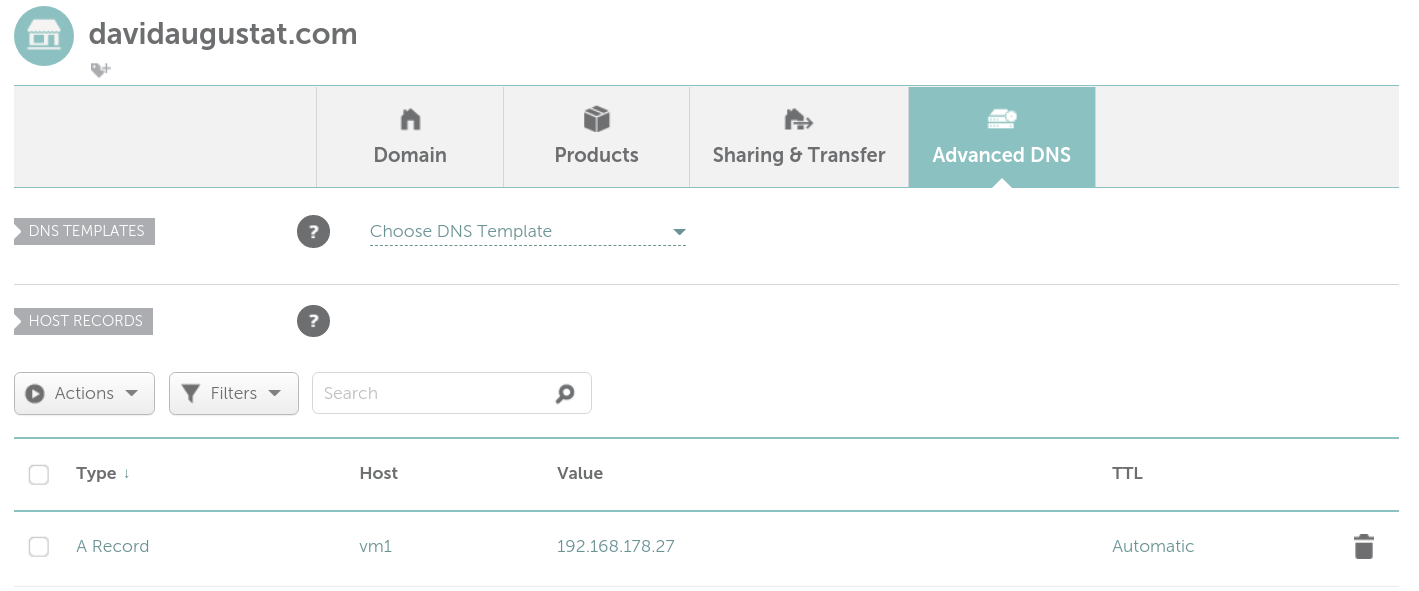
I decided to make my server available at vm1.davidaugustat.com. As you can see in the screenshot, just enter your subdomain as the host. If you don’t want to use a subdomain but make the server available directly at example.com, just enter an “@” as the host. Then enter your local IP address as the value.
Now we need to setup this domain as the so called “server name” in Apache. For this open your virtual hosts configuration file. By default this is located in /etc/apache2/sites-available/000-default.conf. If you never changed the configurations it should look about like this:
# 000-default.conf
<VirtualHost *:80>
    ServerAdmin webmaster@localhost
    DocumentRoot /var/www/html

    ErrorLog ${APACHE_LOG_DIR}/error.log
    CustomLog ${APACHE_LOG_DIR}/access.log combined
</VirtualHost>
Now we need to set the server name to the domain we just pointed to the server’s IP address. Just insert the ServerName option into the file so that it looks like this:
# 000-default.conf
<VirtualHost *:80>
    ServerName vm1.davidaugustat.com
    ServerAdmin webmaster@localhost
    DocumentRoot /var/www/html

    ErrorLog ${APACHE_LOG_DIR}/error.log
    CustomLog ${APACHE_LOG_DIR}/access.log combined
</VirtualHost>
Finally, just restart Apache:
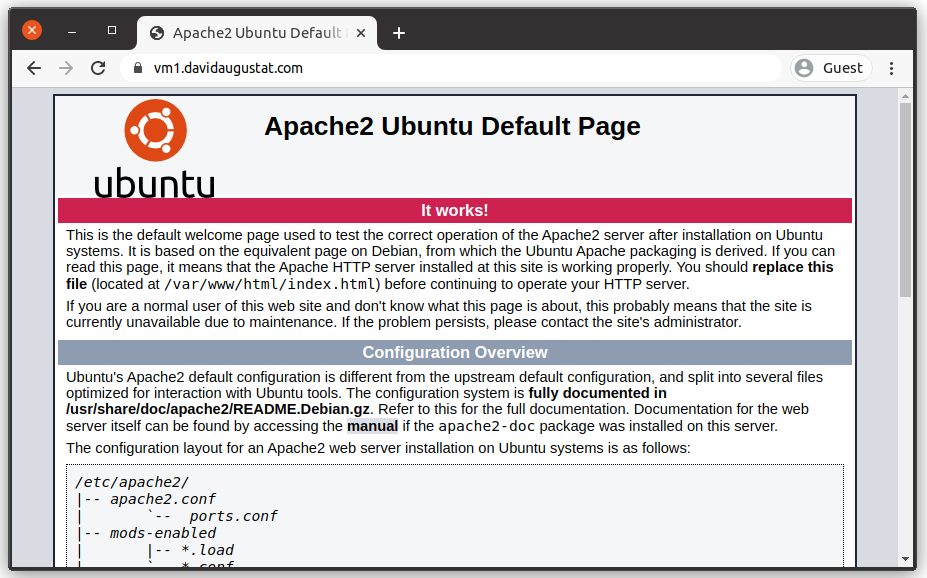
$ sudo systemctl restart apache2Now point your browser at your domain and you will see the website running on your server:
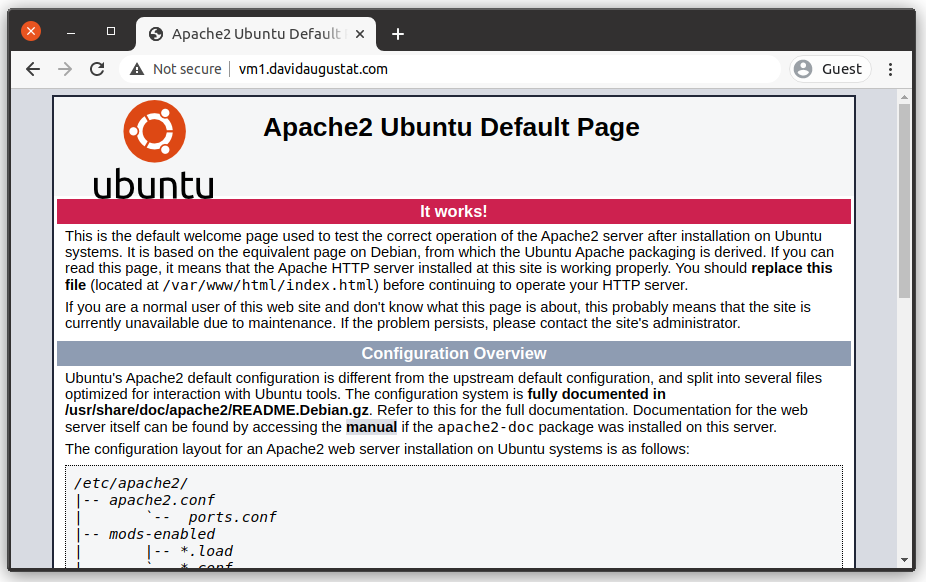
By the way you can also do this while your phone / computer is not connected to your local network (e.g. by using mobile data) and you will see an error message instead, which is what we want.
As you can see, it still shows “Not secure” (meaning no HTTPS), so we aren’t done yet.
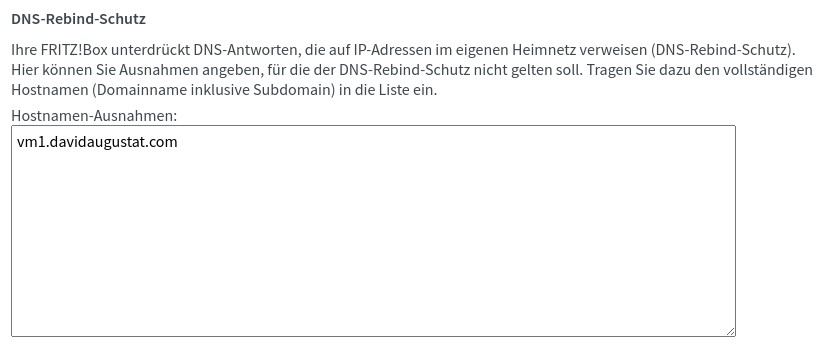
Note: Some routers have a so-called “DNS rebind protection” which blocks domains that point at local IP addresses. If your server is reachable by its IP address but not by the domain, you might have to set an exception in your router’s configuration:
Installing Certbot
For creating the Let’s Encrypt certificate we’ll use the command line tool Certbot. If you’re running a Linux distro that features the APT package manager, you just run following command for installing it:
$ sudo apt-get install certbotFor other package managers there are equivalent commands available. Certbot’s website has a nice command generator which you can use to find out how to install Certbot on you OS.
Creating the Certificate
Now comes the exciting part: Generating the actual SSL certificate. Let’s Encrypt needs to verify that we own the website that we want to generate the certificate for. This is neccessary, so that an attacker cannot generate a certificate for your website and thereby steal your visitors data by a man-in-the-middle attack (I’m not going into detail about this).
For ensuring that we own the website, we must pass one of two so-called “challenges”:
-
HTTP-01 challenge:
For this challenge we must host a token file (which is generated by Certbot) on our webserver. Let’s Encrypt will then visit this our website and obtain the token from there. If it’s the same token that Cerbot transmitted to Let’s Encrypt, then Let’s Encrypt knows that we are the legitimate owner of the website. -
DNS-01 challenge:
For this challenge Certbot will hand us the token it generated. We then have to create a new DNS record (a TXT record) that contains this token. Let’s Encrypt will then make a DNS request for our domain and check if the record with the token exists and matches with the token that Certbot transmitted to Let’s Encrypt. If that is the case, Let’s Encrypt knows that we own the domain.
More info about the challenges can be found here.
The HTTP-01 challenge sounds easier at first, since we do not need to change our DNS records. In fact it is easier (and also easier to automate), but there is a problem: Since our server is only available on our local network, Let’s Encrypt cannot access it. This means that Let’s Encrypt won’t be able to obtain the token from the server and validate it. So unfortunately, this challenge is not for us.
What remains is the DNS-01 challenge. We’re going to use this one to validate our ownership. Run the following command on your server to generate the certificate:
$ sudo certbot certonly --manual --preferred-challenges dns-
certonlymeans that we only want to generate but not install the certificate (we will do this manually later) -
--manualinstructs Certbot to start an interactive dialogue where we can input all required data -
--preferred-challenges dnschanges the challenge to use. By default, Certbot uses the HTTP-01 challenge, which we can’t use as I explained.
When we run this command, Cerbot will start an interactive dialogue:
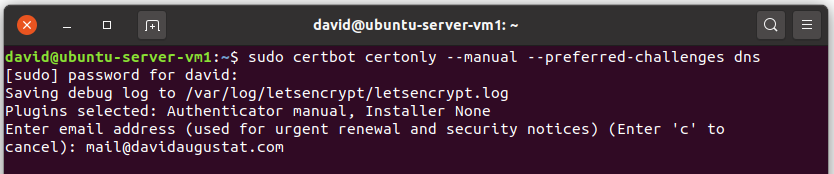
First we are asked to enter an email address. This address is used by Let’s Encrypt to inform you about security risks. Whether you provide a real email address is up to you, but I recommend it.

Then we are asked to agree to the Terms of Service. Enter “A” to do that.

Optionally we can allow the Electronic Frontier Foundation (a founding partner of Certbot) to send us a newsletter. If you hate newsletters as much as I do, just enter “N” for no.

Now we are asked to enter the domain we want to generate the certificate for. In my case this is vm1.davidaugustat.com, so I enter that.
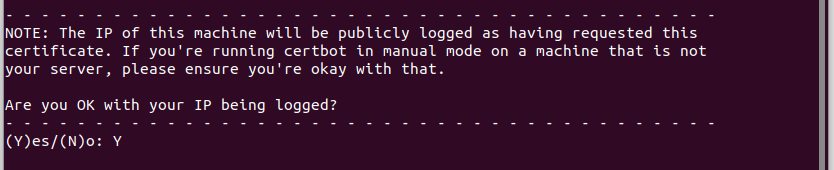
Let’s Encrypt will log the (global) IP address of the device that we used to generate the certificate. There is no way around it and it doesn’t hurt, so enter “Y” to agree.

Now comes the DNS-01 challenge. As the instructions say, log into your domain registrar’s admin panel and create a new TXT record with _acme-challenge.yoursubdomain as the host and the provided token as the value:
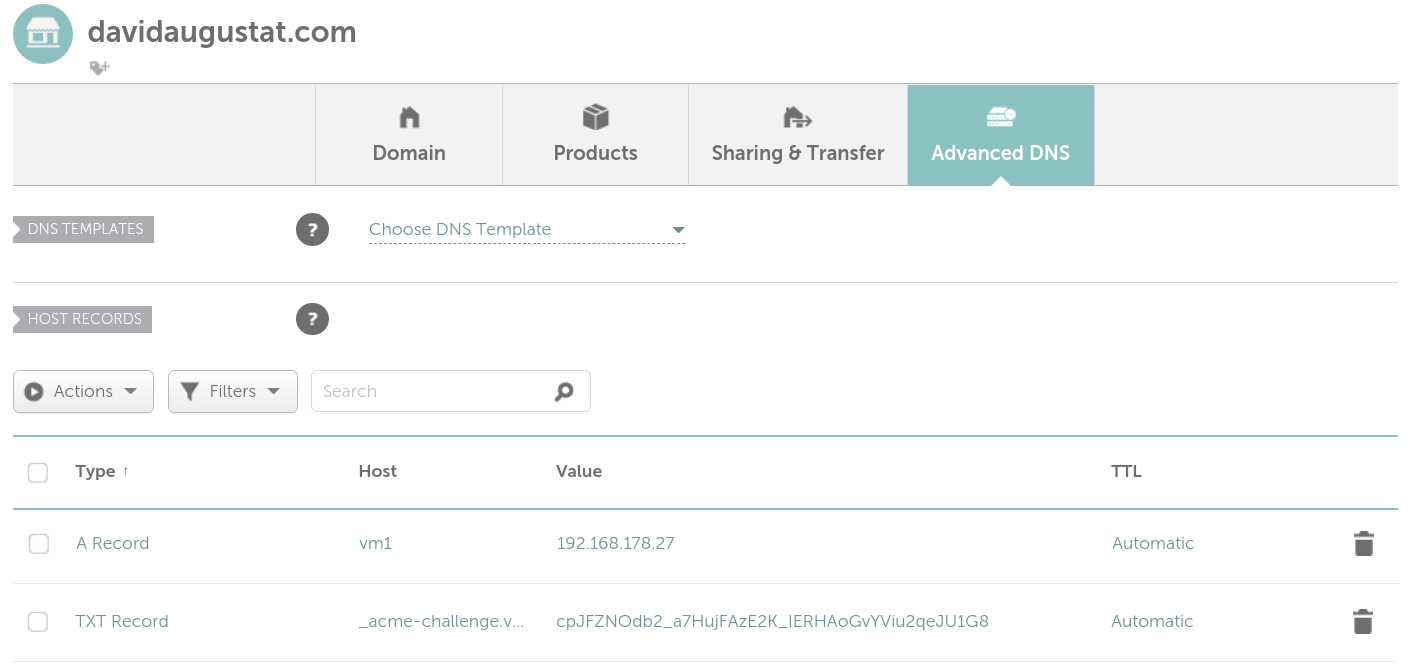
If you don’t use a subdomain, but directly use your domain to access the server, just enter _acme-challenge as the host.
After you have done this, go back to your terminal and hit enter. A message that the certificate has been created successfully, will be displayed:
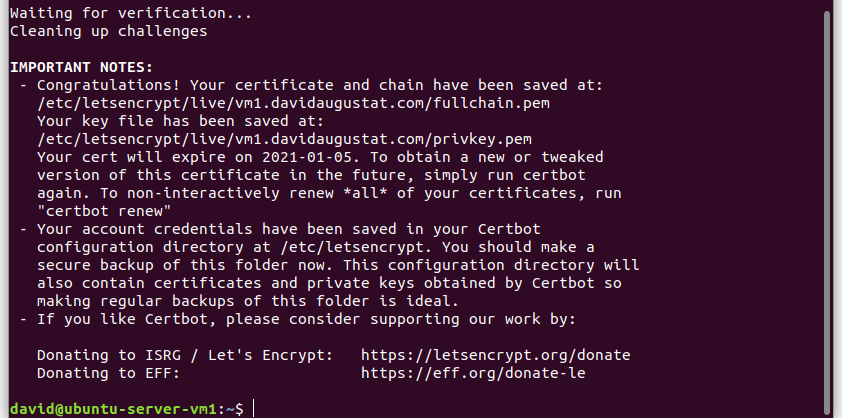
Great! We have now created our SSL certificate.
Let’s have a quick look at what has been generated. All components of the certificate are located at /etc/letsencrypt/live/vm1.davidaugustat.com. (Note that this directory is only accessible with root privileges). Aside from a readme file, we can see following files:
- cert.pem: The public SSL certificate
- chain.pem: SSL uses a chain of trust, meaning that my generated certificate is trusted by Let’s Encrypt which again is trusted by the DST Root Certificate Authority. Browsers only trust root certificate authorities, so to know that my certificate is trustworthy, they also need a certificate from DST to know that Let’s Encrypt is trustworthy. This second certificate is stored in this file.
- fullchain.pem: The certificates from cert.pem and chain.pem bundled into one file (to make configuration easier).
- privkey.pem: The private key of the certificate, used for the encryption of the transmitted data. Never give this key to anyone else! The SSL encryption is only secure as long as the private key stays private.
Configuring Apache to Use the Certificate
Now it’s time to make Apache use our certificate. To do that we must create a second virtual host in our virtual hosts config file (/etc/apache2/sites-available/000-default.conf). For this just copy the existing virtual host (the one we configured at the beginning of this tutorial) and add three additional attributes. Also make sure that you change the port of this virtual host to port 443 (which is the default port for HTTPS). The file should now look about like this:
# 000-default.conf
<VirtualHost *:80>
    ServerName vm1.davidaugustat.com
    ServerAdmin webmaster@localhost
    DocumentRoot /var/www/html

    ErrorLog ${APACHE_LOG_DIR}/error.log
    CustomLog ${APACHE_LOG_DIR}/access.log combined
</VirtualHost>

<VirtualHost *:443>
    ServerName vm1.davidaugustat.com
    ServerAdmin webmaster@localhost
    DocumentRoot /var/www/html

    ErrorLog ${APACHE_LOG_DIR}/error.log
    CustomLog ${APACHE_LOG_DIR}/access.log combined

    # Enable SSL:
    SSLEngine on
    SSLCertificateFile "/etc/letsencrypt/live/vm1.davidaugustat.com/fullchain.pem"
    SSLCertificateKeyFile "/etc/letsencrypt/live/vm1.davidaugustat.com/privkey.pem"
</VirtualHost>-
SSLEngine on: Enable HTTPS for this virtual host -
SSLCertificateFile: The public certificate together with its certificate chain. Use the fullchain.pem file for this, since it contains both, the certificate and its chain. -
SSLCertificateKeyFile: The private key belonging to our certificate. Use the privkey.pem file here.
As these configuration options require the SSL Apache module, we need to enable it using following command:
$ sudo a2enmod sslIf you use the UFW firewall, you must open port 443 so that HTTPS requests get through the firewall:
$ sudo ufw allow 443Finally, it’s time to restart Apache to apply the changes:
$ sudo systemctl restart apache2Now open your browser and go to https://yoursubdomain.yourdomain.tld:
And here we go: Chrome displays a padlock symbol indicating that our site now uses HTTPS.
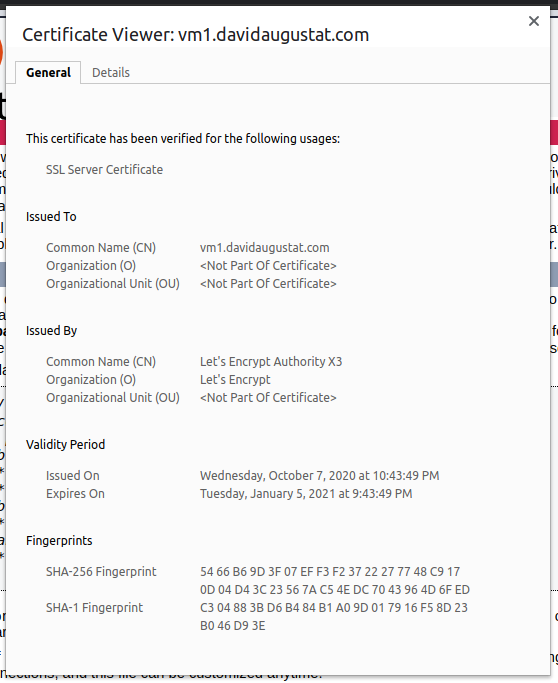
If we open Chrome’s certificate viewer we can also see that the certificate has been issued by Let’s Encrypt and is valid for 3 months from now:
Optional: Redirecting From HTTP to HTTPS
By now it is possible to access both, the HTTP and HTTPS version of the website. To enhance security however, it is recommended to only serve the website via HTTPS and redirect all HTTP requests to HTTPS.
To accomplish that, you only need to modify the virtual host listening on Port 80. Open your virtual hosts config file (/etc/apache2/sites-available/000-default.conf) again, and modify it like this:
# 000-default.conf
<VirtualHost *:80>
    ServerName vm1.davidaugustat.com
    Redirect permanent / https://vm1.davidaugustat.com/
</VirtualHost>

<VirtualHost *:443>
    ServerName vm1.davidaugustat.com
    ServerAdmin webmaster@localhost
    DocumentRoot /var/www/html

    ErrorLog ${APACHE_LOG_DIR}/error.log
    CustomLog ${APACHE_LOG_DIR}/access.log combined

    # Enable SSL:
    SSLEngine on
    SSLCertificateFile "/etc/letsencrypt/live/vm1.davidaugustat.com/fullchain.pem"
    SSLCertificateKeyFile "/etc/letsencrypt/live/vm1.davidaugustat.com/privkey.pem"
</VirtualHost>
The option Redirect permanent / https://vm1.davidaugustat.com/ instructs Apache to redirect every HTTP request to the HTTPS version.
For example http://vm1.davidaugustat.com/page.html will be redirected to https://vm1.davidaugustat.com/page.html.
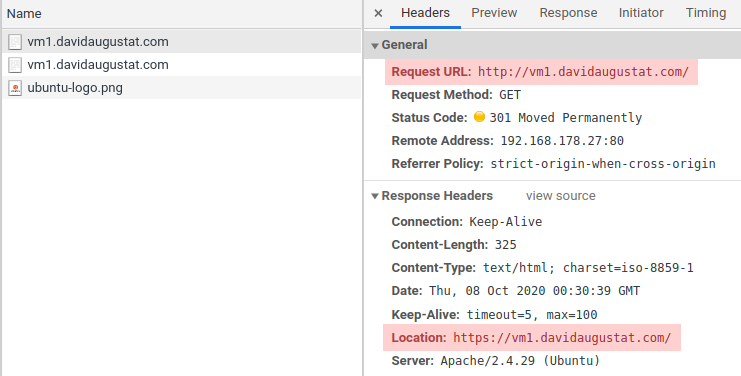
Now just restart Apache and point your browser at http://yoursubdomain.yourdomain.tld. As you can observe, you get redirected to https://yoursubdomain.yourdomain.tld.
Renewing the Certificate
SSL certificates from Let’s Encrypt expire after 3 months. Unfortunately it is not possible to automate the certificate renewal process when using the DNS-01 challenge, since the server would need access to your domain registrar’s account in order to create a TXT record.
This means that you’ll need to renew the certificate manually every three months. To renew a certificate, just run the same command that we used to initially create the certificate. This will automatically update all files of the certificate:
$ sudo certbot certonly --manual --preferred-challenges dnsHowever, I’ve got some good news for you: All of the values you had to type in during the command line dialogue can also be set as parameters. This means you can prepare a renewal command once and always just copy & paste it into the command line to renew the certificate. Such a command looks like this:
$ sudo certbot certonly
 --manual                            # start a dialogue
 --preferred-challenges dns          # use DNS-01 challenge
 --force-renewal                     # renew certificate even when not close to expiration
 --email mail@davidaugustat.com      # set contact email address
 --agree-tos                         # agree to Terms of Service
 --no-eff-email                      # don't sign up for EFF newsletter
 --manual-public-ip-logging-ok       # accept logging of IP address
 --domains vm1.davidaugustat.com     # set domain to register the certificate for
Or in short without comments and line breaks (as a template for you):
$ sudo certbot certonly --manual --preferred-challenges dns --force-renewal --email mail@davidaugustat.com --agree-tos --no-eff-email --manual-public-ip-logging-ok --domains vm1.davidaugustat.comJust replace the email address and domain with yours and you’ve got a nice template. All you need to do after running the command is updating your TXT record and then hit enter. That’s it.
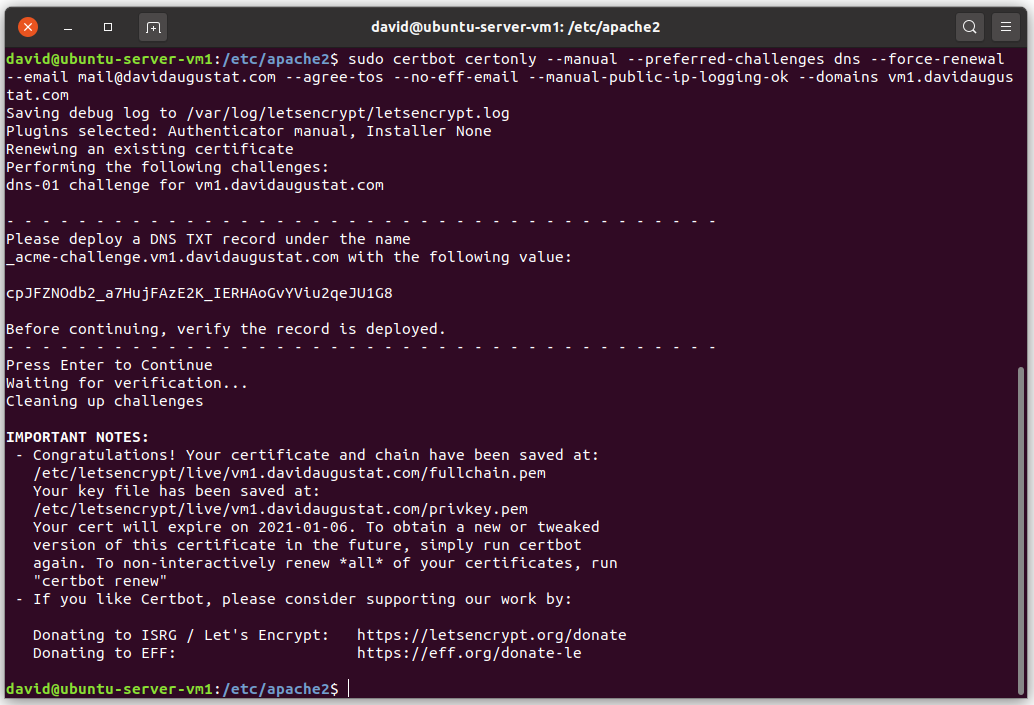
Afterwards just restart Apache to make it use the new certificate.
So yes, while manual action is required every 3 months, the entire process can be done in less than a minute. So basically 4 minutes of maintainance per year – that sounds acceptable if you ask me.
And That’s It
Now your website is served via HTTPS on your local network. This means secure data transmission and no more “Not secure” messages.